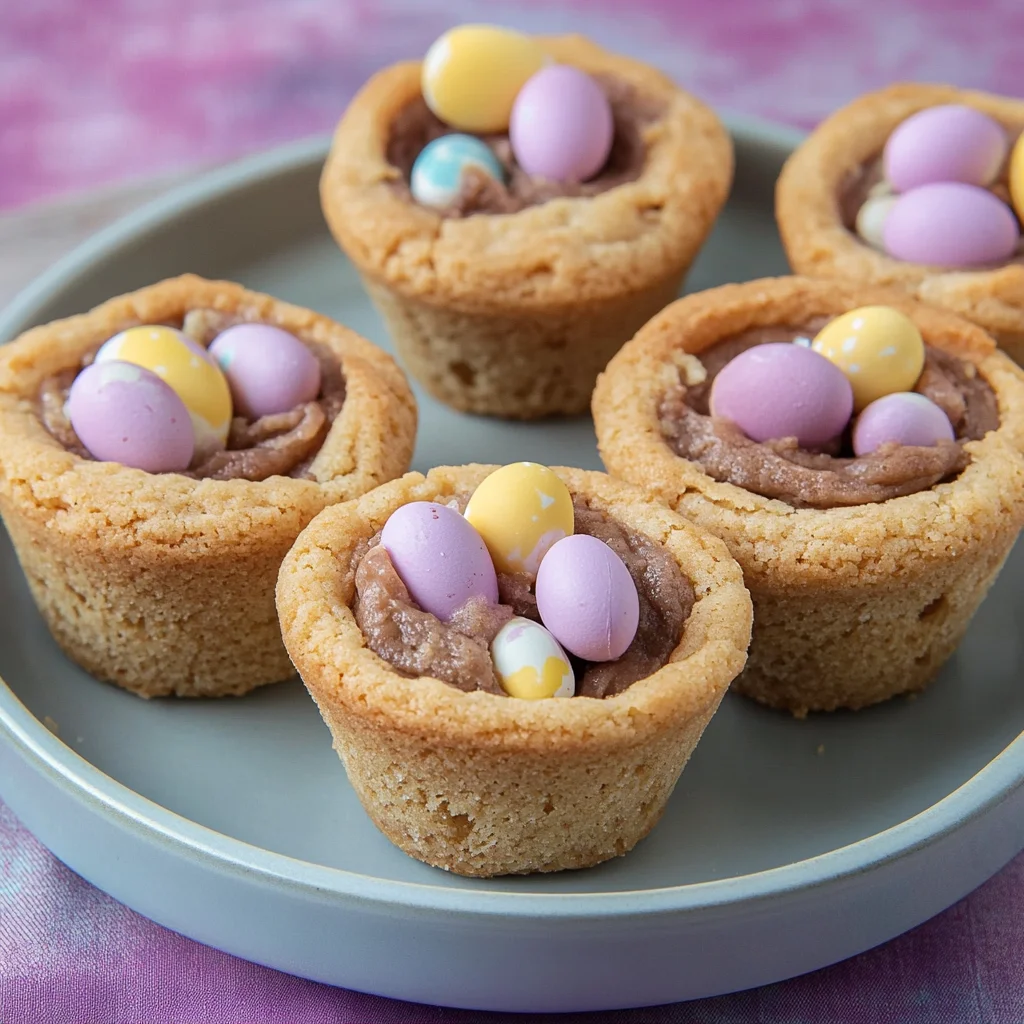
Mini Egg Cookie Cups are a delightful treat that combines the classic cookie experience with a fun twist. These charming cookie cups are filled with rich chocolate ganache and topped with colorful Mini Eggs, making them perfect for Easter celebrations or any festive occasion. Easy to prepare and incredibly tasty, these treats bring joy to both kids and adults alike!
Why You’ll Love This Recipe
- Easy to Make: With simple ingredients and straightforward instructions, these cookie cups come together quickly.
- Delicious Flavor: The combination of milk chocolate chips, crunchy Mini Eggs, and smooth ganache creates a mouthwatering experience.
- Versatile Treat: Perfect for Easter, birthday parties, or just as a sweet snack any day of the week.
- Beautiful Presentation: The vibrant colors of the Mini Eggs make these cookie cups visually appealing.
- Great for Sharing: With 12 servings, these treats are ideal for sharing with family and friends.
Tools and Preparation
Before you start baking your Mini Egg Cookie Cups, ensure you have the right tools at hand. Having everything prepared will make the process smoother and more enjoyable.
Essential Tools and Equipment
- Stand mixer
- Cupcake tin (12-hole)
- Baking paper
- Mixing bowls
- Microwave-safe bowl
- Cooling rack
Importance of Each Tool
- Stand mixer: Helps achieve a fluffy dough consistency quickly and easily.
- Cupcake tin: Essential for shaping the cookie cups perfectly in uniform sizes.
- Mixing bowls: Necessary for combining your ingredients without mess.
Ingredients
For the Cookie Cups
- 100 g Butter (softened, unsalted)
- 100 g Caster sugar
- 65 g Light brown soft sugar
- 1 Egg (large)
- 1 tsp Vanilla extract
- 215 g Plain flour
- 1/2 tsp Baking powder
- 1/4 tsp Bicarbonate of soda
- 1/4 tsp Salt
- 100 g Milk chocolate chips
- 100 g Mini Eggs (crushed)
For the Ganache
- 125 ml Double cream
- 125 g Dark chocolate
- 15 g Butter
For Garnish
- 36 Mini Eggs

How to Make Mini Egg Cookie Cups
Step 1: Preheat the Oven
Preheat the oven to 180°C Fan/Gas Mark 6. Grease a 12-hole cupcake tin with butter or baking spread, then line it with strips of baking paper.
Step 2: Prepare the Dough
Using a stand mixer with the paddle attachment:
1. Mix together the softened butter, caster sugar, and light brown sugar until fluffy and pale in color. This should take about 3–5 minutes on medium speed.
2. Add in the egg and vanilla extract; mix until combined.
Step 3: Combine Dry Ingredients
Add plain flour, baking powder, bicarbonate of soda, and salt into the mixture. Mix until just combined.
Step 4: Add Chocolate Chips
Fold in crushed Mini Eggs and milk chocolate chips gently until they are evenly distributed throughout the dough.
Step 5: Shape Cookie Cups
- Divide the dough into 12 equal portions (about 62g each).
- Roll each portion into a ball and place it into each hole of the cupcake tin.
- Use an object like a small rolling pin or pastry tamper to press down on each ball, forming a cup shape with a dip in the middle.
Step 6: Bake
Bake for about 12 minutes or until golden brown. As soon as they come out of the oven, use your shaping tool again to push down any risen middles gently. Let them cool slightly before transferring them to a cooling rack.
Step 7: Make Ganache
To prepare ganache:
1. In a microwave-safe bowl, combine dark chocolate, butter, and double cream.
2. Microwave on high for 20 seconds; stir well.
3. Continue microwaving in 10-second intervals until smooth and glossy.
Step 8: Fill Cookie Cups
Pipe or spoon ganache into each cooled cookie cup and top with three Mini Eggs for decoration.
Step 9: Store Leftovers
Keep any leftovers in an airtight container for up to 3–4 days. Enjoy your delicious Mini Egg Cookie Cups!
How to Serve Mini Egg Cookie Cups
Mini Egg Cookie Cups are a delightful treat that can be enjoyed in various ways. They make for a perfect dessert at gatherings or a sweet addition to your Easter celebrations. Here are some serving suggestions to elevate your experience.
Celebrate with a Twist
- With Ice Cream: Serve warm Mini Egg Cookie Cups with a scoop of vanilla ice cream on top for an indulgent dessert.
- Chocolate Drizzle: Add an extra layer of decadence by drizzling melted chocolate over the cookie cups before serving.
Pair with Beverages
- Coffee: Enjoy these cookie cups alongside a steaming cup of coffee or espresso for a delightful afternoon pick-me-up.
- Milk: Classic cold milk complements the sweetness of the cookie cups, making it a great choice for both kids and adults.
Creative Presentation Ideas
- Easter Basket Display: Arrange the cookie cups in a small basket lined with colorful tissue paper for an attractive Easter-themed presentation.
- Mini Dessert Plates: Serve each cookie cup on individual mini plates, garnished with fresh mint leaves for added color and freshness.
How to Perfect Mini Egg Cookie Cups
To achieve the best Mini Egg Cookie Cups, keep these tips in mind. They will help you create cookie cups that are perfectly baked and irresistibly delicious.
- Use Softened Butter: Ensure your butter is at room temperature before mixing. This helps achieve a fluffy texture that makes the cookie cups light.
- Do Not Overmix: Mix only until ingredients are combined. Overmixing can lead to tough cookie cups, so be gentle.
- Check Baking Time: Keep an eye on the baking time. Every oven is different, so check for a golden edge while the center remains soft.
- Press Down Immediately: Use your tool to press down the centers of the cookie cups right after they come out of the oven. This helps them hold their shape perfectly.
- Cool Completely: Allow the cookie cups to cool completely before filling them with ganache. This prevents melting and ensures a neat finish.

Best Side Dishes for Mini Egg Cookie Cups
While Mini Egg Cookie Cups are delightful on their own, pairing them with complementary side dishes can enhance your dessert experience. Here are some fantastic options:
- Fresh Fruit Salad: A refreshing mix of seasonal fruits provides balance to the sweetness of the cookie cups.
- Cheesecake Bites: These rich treats add another layer of flavor, perfect for those who love creamy desserts.
- Chocolate Fondue: Dip leftover fruits or cookies into warm chocolate fondue for an interactive dessert experience.
- Nutty Granola Bars: The crunchiness and nuttiness contrast beautifully with the soft texture of cookie cups.
- Mini Cupcakes: Offer a variety of flavors to complement your cookie cups, making for an exciting dessert table.
- Caramel Sauce: A drizzle of caramel sauce adds richness and pairs well with both chocolate and vanilla flavors found in the cookie cups.
Common Mistakes to Avoid
Making Mini Egg Cookie Cups can be a delightful experience, but some common pitfalls can affect the final result. Here are a few mistakes to watch out for:
- Ignoring ingredient temperature: Using cold butter or eggs can hinder the creaming process. Always use softened butter and room temperature eggs for better texture.
- Overmixing the dough: Mixing too long after adding the flour can lead to tough cookie cups. Mix just until combined for a soft, chewy texture.
- Not measuring accurately: Baking is a science, so precise measurements are essential. Use a kitchen scale for accuracy when measuring ingredients like flour and sugar.
- Skipping the cooling process: Removing your cookie cups from the tin while they’re still warm can cause them to break. Allow them to cool slightly before transferring to a cooling rack.
- Filling too much ganache: Overfilling with ganache can lead to messy cookie cups. Fill them just enough to create a delicious treat without overflowing.
Storage & Reheating Instructions
Refrigerator Storage
- Store in an airtight container for up to 3-4 days.
- Place parchment paper between layers to prevent sticking.
Freezing Mini Egg Cookie Cups
- Freeze in an airtight container for up to 2 months.
- Separate layers with baking paper to avoid sticking.
Reheating Mini Egg Cookie Cups
- Oven: Preheat your oven to 160°C (320°F) and warm the cookie cups for about 5 minutes.
- Microwave: Heat in short bursts of 10-15 seconds until just warm, being careful not to overheat.
- Stovetop: Use a skillet on low heat, covering with a lid for even warming without drying out.

Frequently Asked Questions
How do I make Mini Egg Cookie Cups gluten-free?
To make these cookie cups gluten-free, substitute plain flour with your favorite gluten-free flour blend. Ensure that all other ingredients are also gluten-free.
Can I use different types of chocolate?
Absolutely! Feel free to experiment with white chocolate or dark chocolate instead of milk chocolate chips for a different flavor profile in your Mini Egg Cookie Cups.
How do I store leftover Mini Egg Cookie Cups?
Store leftover cookie cups in an airtight container at room temperature for up to three days or in the refrigerator if you prefer them chilled.
Can I customize my Mini Egg Cookie Cups?
Yes! You can add nuts, dried fruit, or switch out mini eggs for other candies or chocolates according to your preference.
What should I serve with Mini Egg Cookie Cups?
These delightful treats pair well with coffee, tea, or even ice cream for an extra indulgent dessert option!
Final Thoughts
These Mini Egg Cookie Cups are not only perfect for Easter but also versatile enough for any occasion. With their soft cookie base and rich chocolate ganache filling, they are sure to impress family and friends. Feel free to customize your cookie cups by adding different fillings and toppings! Enjoy creating this sweet treat!

Mini Egg Cookie Cups
Mini Egg Cookie Cups are a delightful twist on traditional cookies, perfect for celebrating festive occasions like Easter. These charming cookie cups feature a soft, buttery base filled with luscious chocolate ganache and topped with colorful Mini Eggs, making them an irresistible treat for all ages. Easy to prepare and visually appealing, they bring joy to gatherings or simply as a sweet snack any day of the week. With just a few simple ingredients and straightforward steps, you can create these delicious cookie cups that will impress family and friends alike.
- Total Time: 32 minutes
- Yield: Makes 12 servings 1x
Ingredients
- 100 g unsalted butter (softened)
- 100 g caster sugar
- 65 g light brown sugar
- 1 large egg
- 1 tsp vanilla extract
- 215 g plain flour
- 1/2 tsp baking powder
- 1/4 tsp bicarbonate of soda
- 1/4 tsp salt
- 100 g milk chocolate chips
- 100 g crushed Mini Eggs
- 125 ml double cream (for ganache)
- 125 g dark chocolate (for ganache)
- 15 g butter (for ganache)
- 36 Mini Eggs (for garnish)
Instructions
- Preheat oven to 180°C (Fan/Gas Mark 6) and grease a 12-hole cupcake tin with baking paper.
- In a stand mixer, beat softened butter and sugars until fluffy. Add the egg and vanilla; mix well.
- Combine dry ingredients in a bowl; gradually add to the wet mixture until just combined.
- Fold in crushed Mini Eggs and milk chocolate chips.
- Shape dough into balls and press into the cupcake tin to form cups.
- Bake for about 12 minutes or until golden brown; let cool slightly before transferring to a rack.
- For ganache, microwave dark chocolate, cream, and butter until smooth; fill cooled cookie cups and top with Mini Eggs.
- Prep Time: 20 minutes
- Cook Time: 12 minutes
- Category: Dessert
- Method: Baking
- Cuisine: American
Nutrition
- Serving Size: 1 serving
- Calories: 220
- Sugar: 16g
- Sodium: 120mg
- Fat: 10g
- Saturated Fat: 6g
- Unsaturated Fat: 4g
- Trans Fat: 0g
- Carbohydrates: 30g
- Fiber: 1g
- Protein: 2g
- Cholesterol: 30mg
Keywords: Ensure your butter is softened for easy mixing. Avoid overmixing the dough to maintain a tender texture. Experiment with different chocolate types for unique flavors.