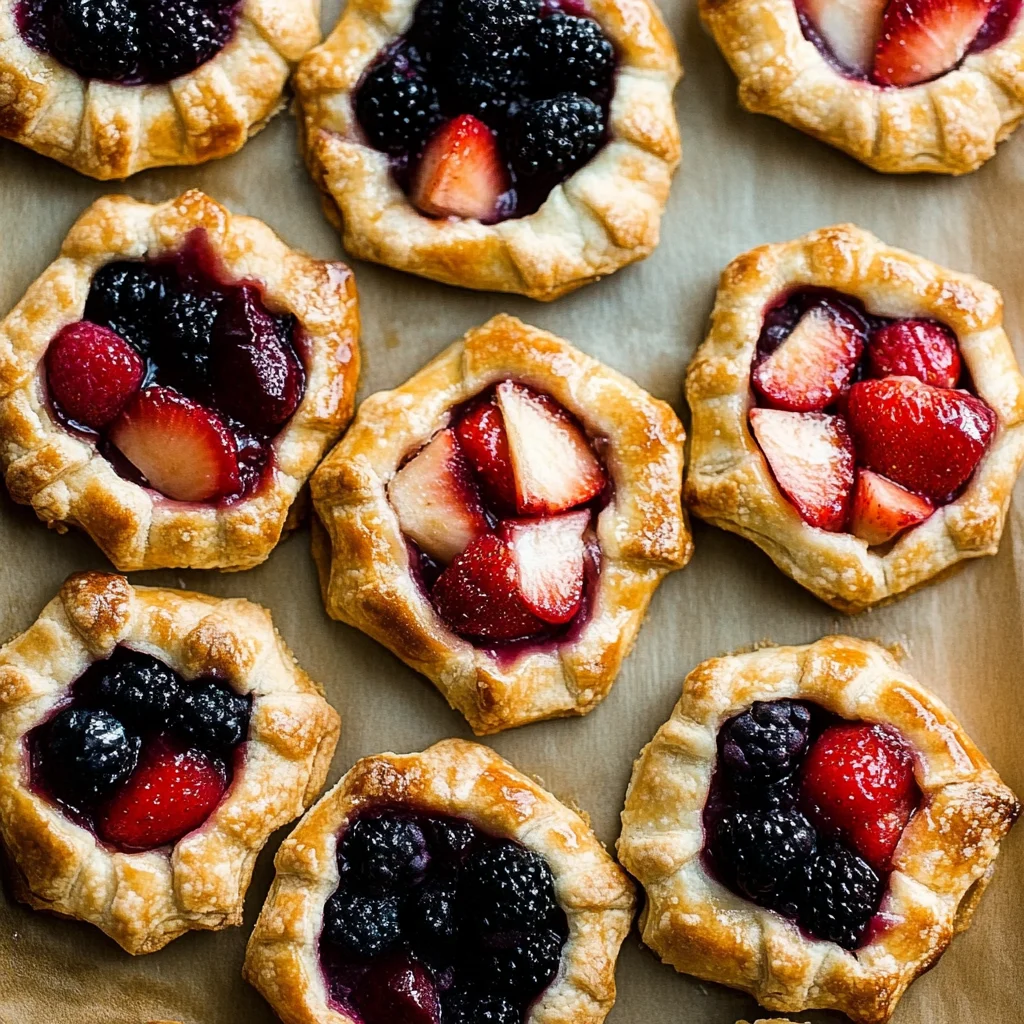
Mini Fruit Galettes are a delightful treat that brings the joy of fruit-filled pastries into perfect, shareable bites. These mini galettes are incredibly versatile, making them suitable for any occasion, from casual gatherings to elegant dinner parties. With their flaky crust and vibrant fruit filling, they stand out as a fun alternative to traditional pies. Plus, they’re easy to customize with your favorite fruits, ensuring everyone can enjoy a personal touch.
Why You’ll Love This Recipe
- Quick and Easy: Mini fruit galettes come together quickly, making them perfect for last-minute desserts.
- Customizable Filling: You can use any seasonal fruits you love, giving you endless flavor combinations.
- Perfect Portions: Each galette is a single serving, which makes them great for parties or family meals.
- Gorgeous Presentation: With their rustic look, these galettes impress guests without requiring intricate decorating skills.
- Make Ahead Option: You can prep the dough and filling in advance, so they’re ready to bake when you need them.
Tools and Preparation
To make Mini Fruit Galettes, you’ll need a few essential tools that will help streamline your cooking process. Gathering these items before you start will make the task much easier.
Essential Tools and Equipment
- Rolling pin
- Cookie cutters or bowl for shaping
- Baking sheets
- Parchment paper or silicone baking mats
- Mixing bowls
Importance of Each Tool
- Rolling pin: A rolling pin helps you achieve the perfect thickness for your pie crust, ensuring even baking.
- Baking sheets: Quality baking sheets provide even heat distribution for perfectly baked galettes every time.
- Mixing bowls: Using mixing bowls keeps your ingredients organized and makes combining them a breeze.
Ingredients
Using pie dough and a simple fruit filling, you can create mini galettes that are perfectly portioned and fun to serve as an alternative to a full pie or galette. Review the recipe notes below and the helpful video tutorial before beginning.
- Flaky Pie Crust or All Butter Pie Crust dough (either recipe makes enough dough for this)
- 2 and 1/2 cups (about 350-400g) mixed berries or other fruit (see note)
- 1 Tablespoon (8g) cornstarch
- 2 Tablespoons (25g) granulated sugar
- 1 teaspoon lemon juice or vanilla extract
- 2 Tablespoons (30ml) whole milk, for brushing
- optional for topping: coarse sugar and/or chopped/sliced nuts

How to Make Mini Fruit Galettes
Step 1: Prepare Your Dough
Make sure your pie dough is prepared before you begin. It’s best to make it the night before since it needs to chill in the refrigerator for at least 2 hours before using.
Step 2: Line Baking Sheets
Line two large baking sheets with parchment paper or silicone baking mats. Ensure there’s enough room in your refrigerator for these trays because the shaped galettes must chill later.
Step 3: Mix Fruit Filling
Gently stir the berries, cornstarch, sugar, and lemon juice or vanilla together in a medium bowl until well combined. Place this mixture in the refrigerator until you’re ready to use it.
Step 4: Roll Out Dough
Working with one chilled pie dough at a time, place it on a floured work surface. Roll it out into a large 12-inch circle. Use your hands to mold any cracking edges back together. Cut rounds using a 5.5 to 6-inch cookie cutter or by tracing with a bowl’s rim. You should get about five rounds per pie crust; repeat with the second dough.
Step 5: Assemble Galettes
Arrange the dough rounds on prepared baking sheets. Remove your fruit filling from the refrigerator and spoon about 1/4 cup into the center of each round, leaving excess juice behind. Gently fold the edges over the filling while leaving the center exposed.
Step 6: Brush and Sprinkle
Brush the edges of each galette with milk to promote browning during baking. If desired, sprinkle with coarse sugar or sliced nuts for added texture.
Step 7: Chill Before Baking
Chill shaped galettes in the refrigerator for at least 20 minutes but up to four hours. This step is crucial; if they aren’t chilled properly, they may lose shape during baking.
Step 8: Preheat Oven
Preheat your oven to 375°F (191°C).
Step 9: Bake Galettes
Bake chilled galettes for approximately 25-28 minutes or until their edges are lightly browned.
Step 10: Cool Before Serving
Remove from the oven and let cool for at least five minutes before enjoying them warm or at room temperature. Serve plain or alongside ice cream or whipped cream.
Step 11: Store Leftovers
Cover leftover mini galettes and store them in the refrigerator for up to five days. Enjoy!
How to Serve Mini Fruit Galettes
Mini fruit galettes are delightful and versatile desserts that can be enjoyed in various ways. Whether for a casual family dinner or an elegant gathering, these mini treats can be easily adapted to suit any occasion.
With Ice Cream
- Vanilla Ice Cream – A classic pairing that complements the fruity flavors.
- Berry Sorbet – A refreshing alternative that enhances the berry taste.
As a Breakfast Treat
- Yogurt Parfait – Serve with Greek yogurt and fresh berries for a healthy start.
- Coffee – Pair with your morning brew for a delightful breakfast experience.
At Celebrations
- Dessert Table Feature – Arrange on a platter as part of a dessert spread at parties.
- Gift Boxes – Package them up as sweet gifts for friends and family.
With Whipped Cream
- Homemade Whipped Cream – Top with freshly whipped cream to elevate the dessert.
- Flavored Whipped Cream – Try vanilla or almond extract for a twist.
How to Perfect Mini Fruit Galettes
Creating the perfect mini fruit galettes requires attention to detail. Here are some tips to ensure success every time you bake these delicious treats.
- Chill the Dough – Ensure your pie dough is well-chilled before rolling it out to prevent shrinkage during baking.
- Use Fresh Fruit – Opt for seasonal fruits for the best flavor and texture in your filling.
- Don’t Overfill – Use only the recommended amount of filling to avoid messy overflow while baking.
- Brush with Milk – This helps achieve a golden-brown color on the crust, enhancing its visual appeal.
- Chill Before Baking – Allow shaped galettes to chill in the refrigerator before baking; this helps maintain their shape.
- Experiment with Flavors – Try different fruits, spices, or extracts in the filling for unique variations.

Best Side Dishes for Mini Fruit Galettes
Mini fruit galettes can be complemented by various side dishes that enhance their flavors. Here are some great options:
- Fresh Fruit Salad – A light and refreshing mix of seasonal fruits that pairs well with galettes.
- Cheese Platter – Include soft cheeses like brie or goat cheese for a savory contrast.
- Granola – Serve alongside granola for added crunch and texture.
- Chocolate Sauce – Drizzle melted chocolate over the galettes for an indulgent touch.
- Mint Sprigs – Garnish with fresh mint for a pop of color and refreshing flavor.
- Caramel Sauce – Offer caramel sauce as a dip or drizzle option for an extra treat.
Common Mistakes to Avoid
Making mini fruit galettes can be a delightful experience, but there are common pitfalls to watch for. Here are some mistakes to avoid.
- Skipping the chilling step: Not chilling the dough properly can lead to a tough texture. Always chill your pie dough for at least 2 hours before using it.
- Overfilling the galettes: Adding too much filling can cause the galettes to burst open while baking. Stick to about 1/4 cup of filling per galette for the best results.
- Ignoring oven preheating: Baking in an unpreheated oven may result in uneven cooking. Make sure your oven is preheated to 375°F (191°C) before placing the galettes inside.
- Using overly ripe fruit: Overripe fruit can release too much juice, making your filling soggy. Choose fresh, firm fruits for a balanced texture and flavor.
- Neglecting the egg wash: Skipping the milk wash on the edges means you might miss out on golden, crispy crusts. Brush each galette with milk before baking for that perfect finish.
Storage & Reheating Instructions
Refrigerator Storage
- Store mini fruit galettes in an airtight container.
- They will stay fresh in the refrigerator for up to 5 days.
- Place parchment paper between layers if stacking them to prevent sticking.
Freezing Mini Fruit Galettes
- Freeze unbaked mini fruit galettes for best results.
- Wrap them tightly in plastic wrap and then place in a freezer-safe bag.
- They can be stored in the freezer for up to 2 months.
Reheating Mini Fruit Galettes
- Oven: Preheat your oven to 350°F (175°C). Place the galettes on a baking sheet and heat for about 10-15 minutes or until warm.
- Microwave: Use a microwave-safe plate and heat on medium power for about 30 seconds. This method may make them slightly soft.
- Stovetop: Heat on low in a skillet, covered, for about 5 minutes. This helps retain crispness while warming through.
Frequently Asked Questions
Can I make Mini Fruit Galettes ahead of time?
You can prepare the filling and dough ahead of time. Just refrigerate both separately until you’re ready to assemble and bake.
What types of fruit work best in Mini Fruit Galettes?
Mixed berries work wonderfully, but you can use other fruits like peaches, apples, or cherries. Just remember to adjust sugar based on sweetness!
How do I know when my Mini Fruit Galettes are done?
Look for lightly browned edges on the crust. The filling should be bubbling slightly as well.
Can I customize the filling of my Mini Fruit Galettes?
Absolutely! Feel free to add spices like cinnamon or nutmeg, or mix different fruits together for unique flavors.
Are Mini Fruit Galettes suitable for different diets?
Yes! You can easily make gluten-free versions by using alternative pie crusts or even go vegan by substituting dairy ingredients with plant-based options.
Final Thoughts
Mini fruit galettes are not only visually appealing but also versatile and easy to customize according to your taste preferences. Whether you enjoy them warm with ice cream or as a simple dessert treat, these galettes promise delightful bites every time. Give this recipe a try and explore different fruits and flavors!

Mini Fruit Galettes
Mini Fruit Galettes are delightful, bite-sized pastries that bring the joy of fresh fruit to any table. With a flaky crust and vibrant fruit filling, these galettes are incredibly versatile and can easily be tailored to your favorite seasonal fruits. Perfect for casual gatherings or elegant dinner parties, they offer a fun alternative to traditional pies while being quick and easy to prepare. Each galette serves as a personal dessert portion, making them ideal for sharing with friends and family. Plus, you can prep the dough and filling ahead of time, allowing for a stress-free baking experience when you’re ready to impress.
- Total Time: 58 minutes
- Yield: Serves approximately 10 mini galettes 1x
Ingredients
- Flaky pie crust or all-butter pie crust dough
- 2 and 1/2 cups mixed berries or other seasonal fruits
- 1 tablespoon cornstarch
- 2 tablespoons granulated sugar
- 1 teaspoon lemon juice or vanilla extract
- 2 tablespoons whole milk (for brushing)
- Optional: coarse sugar and/or chopped nuts for topping
Instructions
- Prepare your pie dough in advance and chill it in the refrigerator for at least 2 hours.
- Preheat your oven to 375°F (191°C) and line two baking sheets with parchment paper.
- In a bowl, gently mix the fruit with cornstarch, sugar, and lemon juice or vanilla; refrigerate until ready.
- Roll out the chilled dough into a large circle and cut out rounds.
- Spoon fruit filling onto the center of each round, fold edges over while leaving the center exposed.
- Brush edges with milk and sprinkle optional toppings if desired.
- Chill shaped galettes for at least 20 minutes before baking.
- Bake for 25-28 minutes until edges are lightly browned.
- Allow cooling for five minutes before serving.
- Prep Time: 30 minutes
- Cook Time: 28 minutes
- Category: Dessert
- Method: Baking
- Cuisine: American
Nutrition
- Serving Size: 1 serving
- Calories: 250
- Sugar: 12g
- Sodium: 125mg
- Fat: 12g
- Saturated Fat: 6g
- Unsaturated Fat: 5g
- Trans Fat: 0g
- Carbohydrates: 33g
- Fiber: 2g
- Protein: 3g
- Cholesterol: 15mg
Keywords: Choose fresh, firm fruit for best results. Feel free to experiment with different fruit combinations or add spices like cinnamon.