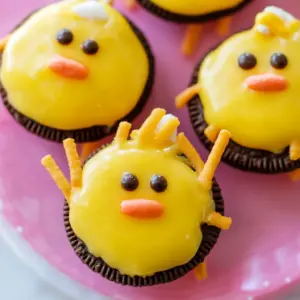
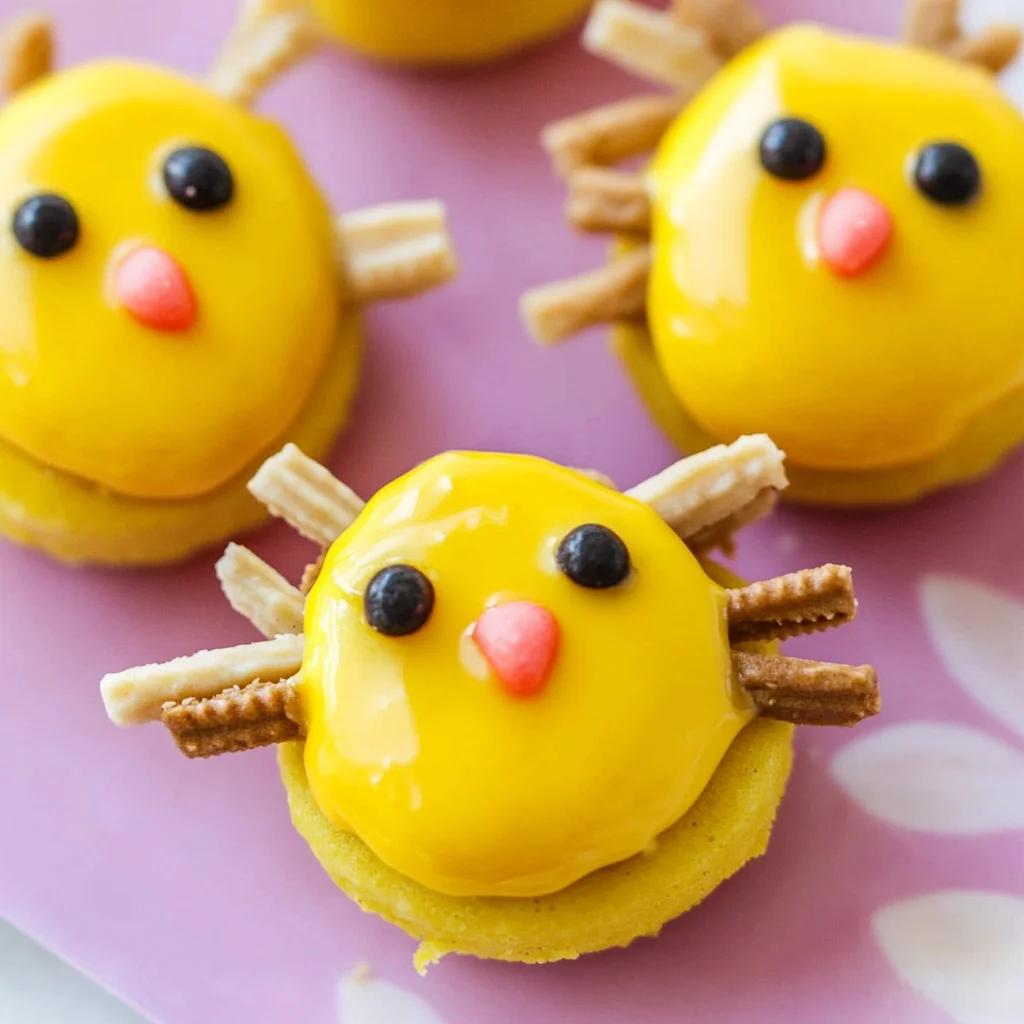
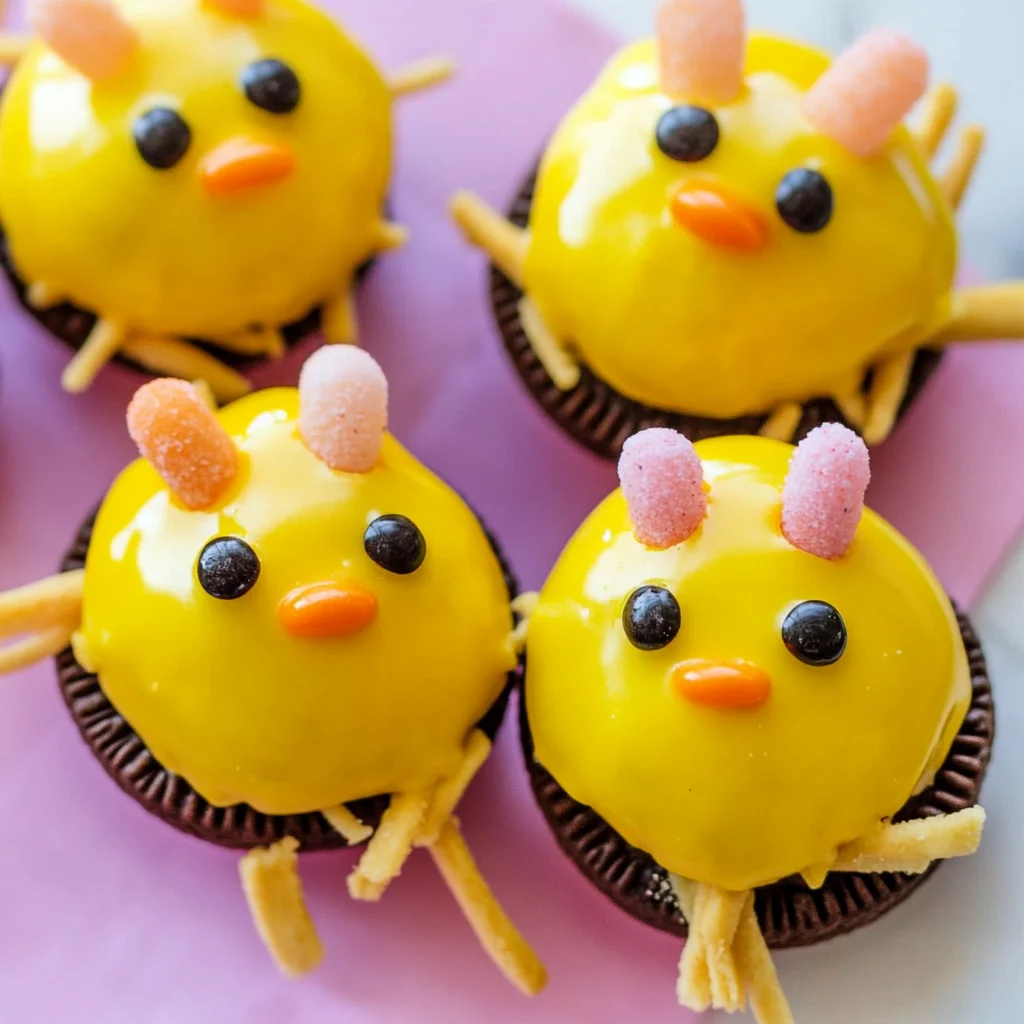
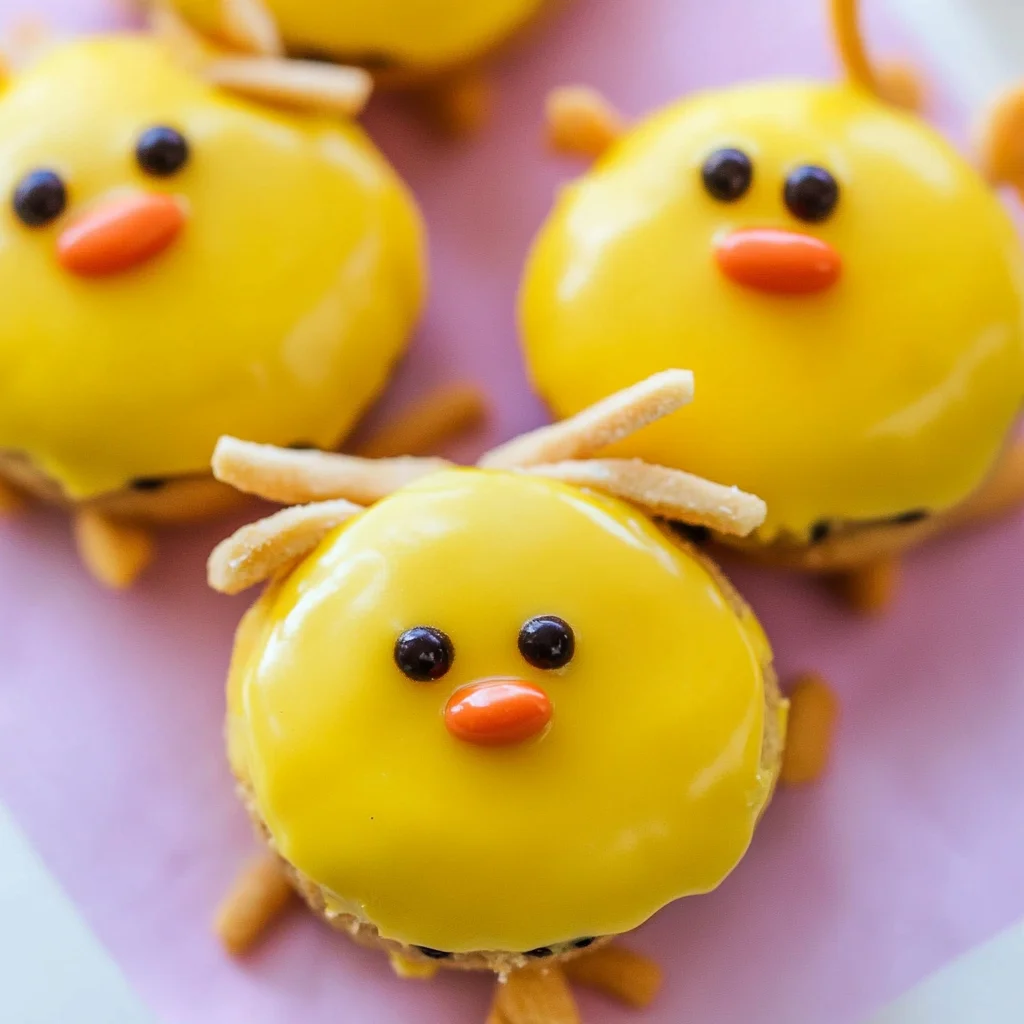
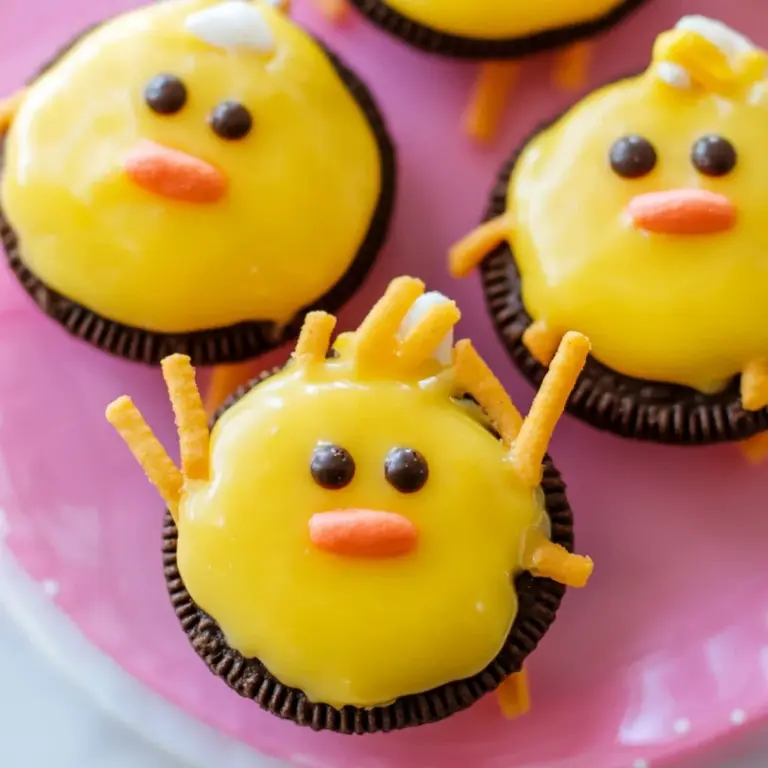
Oreo Easter Chicks are a delightful and creative treat that bring a fun twist to traditional Easter desserts. These cute little chicks made from Oreo cookies are perfect for Easter celebrations, parties, or just as a fun baking project with kids. The combination of yellow candy melts and pretzel sticks not only makes them adorable but also adds a delicious flavor that everyone will enjoy.
Why You’ll Love This Recipe
- Quick and Easy: With only a few simple steps, you can whip up these adorable treats in no time.
- Kid-Friendly: This recipe is perfect for kids to help with, making it a fun family activity during the holiday season.
- Customizable: Feel free to get creative! You can change the colors or add different decorations to suit your style.
- Perfect for Parties: These treats make great additions to any Easter gathering or celebration, sure to impress guests of all ages.
- Deliciously Fun: The combination of creamy Oreos and sweet candy melts creates an irresistible flavor that everyone will love.
Tools and Preparation
Gathering the right tools is essential for creating your Oreo Easter Chicks. Having everything ready will make the process smoother and more enjoyable.
Essential Tools and Equipment
- Wax paper
- Baking sheet
- Microwave-safe bowl
- Spoon or dipping tool
Importance of Each Tool
- Wax paper: Prevents sticking and makes clean-up easier after dipping the Oreos.
- Baking sheet: Provides a stable surface for setting the dipped Oreos while they cool.
- Microwave-safe bowl: Allows you to melt candy melts safely without damaging your tools.
- Spoon or dipping tool: Helps in covering the Oreos thoroughly with melted candy.
Ingredients
Oreo Easter Chicks are a super fun way to turn oreo cookies into a delicious Easter treat using yellow candy melts and pretzel sticks.
For the Chicks
- 1-2 bags yellow candy melts
- 1 package double-stuff oreos
- mini chocolate chips
- thin pretzel rods (broken into short pieces)
- orange decorating gel or orange candy melts
How to Make Oreo Easter Chicks
Step 1: Melt the Candy Melts
Melt yellow candy melts according to package directions. Be sure to do this carefully so as not to burn them.
Step 2: Prepare Your Work Area
Place a piece of wax paper on a baking sheet. This will provide a non-stick surface for your dipped Oreos.
Step 3: Dip the Oreos
Dip each Oreo cookie in the melted yellow candy melts, ensuring they are fully covered. Use a spoon if needed to help cover them evenly.
Step 4: Add Chick Details
Place the dipped Oreos on the wax paper. Quickly stick 2 pretzel pieces into each cookie for legs and use 2 mini chocolate chips for eyes.
Step 5: Create Beaks
Using orange decorating gel or melted orange candy melts, add small beaks to each chick.
Step 6: Set in Refrigerator
Place your decorated cookies in the refrigerator to set until firm, usually about 10-15 minutes.
Now you have adorable Oreo Easter Chicks ready for your celebrations! Enjoy sharing these delightful treats with friends and family.
How to Serve Oreo Easter Chicks
Oreo Easter Chicks are a delightful treat that can bring joy to any Easter gathering. These cute little chicks not only taste amazing but also make for a fun presentation. Here are some creative serving suggestions to make the most of your Oreo Easter Chicks.
On a Festive Platter
- Arrange the Oreo Easter Chicks on a colorful platter surrounded by Easter-themed decorations like plastic eggs or spring flowers for an eye-catching display.
In Individual Treat Bags
- Package each chick in clear treat bags tied with pastel ribbons. This makes for a perfect party favor or fun addition to an Easter egg hunt.
Alongside Seasonal Desserts
- Serve your Oreo Easter Chicks alongside other festive desserts such as carrot cake or bunny-shaped cookies to create an impressive dessert table.
With a Milkshake
- Pair the Oreo Easter Chicks with a creamy vanilla or chocolate milkshake. The combination of flavors will delight both kids and adults alike!
How to Perfect Oreo Easter Chicks
Creating the perfect Oreo Easter Chicks is easy with just a few tips. Follow these guidelines to ensure your treats are as cute as they are delicious.
- Choose Quality Ingredients: Use high-quality candy melts and fresh Oreos for better flavor and consistency.
- Work Quickly: Dip the Oreos and add decorations while the candy melts are still warm to ensure everything sticks properly.
- Chill Before Serving: Allow the chicks to set in the refrigerator for at least 15 minutes before serving. This helps them hold their shape.
- Customize Faces: Get creative with decorating! Use different colored candies for eyes or add little accessories like bows made from icing.
Best Side Dishes for Oreo Easter Chicks
To complement your Oreo Easter Chicks, consider adding some delightful side dishes that will enhance your overall feast. Here are some great options:
- Carrot Sticks with Hummus: Fresh carrot sticks served with creamy hummus provide a healthy crunch that balances out the sweetness of the treats.
- Deviled Eggs: These classic appetizers add a savory touch and are always popular at holiday gatherings.
- Fruit Salad: A refreshing mix of seasonal fruits can offer a light contrast to the rich flavors of the Oreo chicks.
- Mini Sandwiches: Create small sandwiches using various fillings like ham, turkey, or veggie spreads for easy snacking.
- Cheese Platter: Include an assortment of cheeses paired with crackers for guests looking for something savory.
- Chocolate-Covered Pretzels: These sweet-and-salty snacks will echo the pretzel legs on your chicks and delight any chocolate lover!
Common Mistakes to Avoid
Making Oreo Easter Chicks can be a delightful experience, but it’s easy to make some common mistakes. Here are a few to watch out for:
- Skipping the wax paper: This can lead to a sticky mess. Always line your baking sheet with wax paper to prevent the treats from sticking.
- Overheating candy melts: If you overheat candy melts, they can become grainy. Follow package instructions carefully and heat in short intervals.
- Not working quickly: The candy melts set fast. Make sure to add pretzel legs and chocolate chip eyes while the coating is still wet.
- Using stale Oreos: Old cookies can affect the taste and texture. Always use fresh double-stuff Oreos for the best results.
Storage & Reheating Instructions
Refrigerator Storage
- Duration: Store Oreo Easter Chicks in the refrigerator for up to 1 week.
- Containers: Use an airtight container to keep them fresh and prevent them from absorbing odors.
Freezing Oreo Easter Chicks
- Duration: You can freeze these treats for up to 2 months.
- Containers: Place them in a single layer on a baking sheet until frozen, then transfer to a freezer-safe bag or container.
Reheating Oreo Easter Chicks
- Oven: Preheat to 300°F (150°C). Place chicks on a baking sheet for about 5-10 minutes. This will help soften them slightly without melting the decoration.
- Microwave: Heat on low power in 15-second intervals until just warm. Be cautious not to melt the candy coating.
- Stovetop: Not recommended as this may ruin the decorations.
Frequently Asked Questions
What are Oreo Easter Chicks?
Oreo Easter Chicks are fun, festive treats made by dipping Oreos in yellow candy melts, creating adorable chick designs perfect for Easter celebrations.
Can I customize my Oreo Easter Chicks?
Yes! You can customize them with different colors of candy melts or add edible glitter for extra sparkle.
How do I make Oreo Easter Chicks more colorful?
Consider using colored sprinkles or edible markers after the yellow coating has dried for added color and fun designs.
How should I store leftover Oreo Easter Chicks?
Store them in an airtight container in the refrigerator or freeze them if you want to keep them longer.
Final Thoughts
Oreo Easter Chicks are not only cute but also incredibly versatile and easy to make! These delightful treats are perfect for any spring celebration, allowing you to customize them with various decorations. Try making them your own by adding flavors or colors that suit your style!
Oreo Easter Chicks
Oreo Easter Chicks are whimsical and delightful treats perfect for your Easter celebrations. These adorable little chicks, crafted from double-stuffed Oreos and coated in bright yellow candy melts, are sure to impress family and friends. Easy to make and fun for kids to help with, this recipe allows for customization with different colors and decorations, making it a versatile project for any festive gathering. With their delicious combination of creamy Oreo goodness and sweet candy coating, these treats are not only visually appealing but also irresistibly tasty. Whether you display them on a festive platter or package them as party favors, Oreo Easter Chicks will add a charming touch to your holiday festivities.
- Total Time: 15 minutes
- Yield: Approximately 12 servings 1x
Ingredients
- 1–2 bags yellow candy melts
- 1 package double-stuffed Oreos
- Mini chocolate chips
- Thin pretzel rods (broken into short pieces)
- Orange decorating gel or orange candy melts
Instructions
- Melt the yellow candy melts in a microwave-safe bowl according to package instructions.
- Line a baking sheet with wax paper.
- Dip each Oreo into the melted candy melts, ensuring they are fully coated.
- Place the dipped Oreos on the wax paper. Insert two pretzel pieces into each cookie for legs and use mini chocolate chips for eyes.
- Add small beaks using orange decorating gel or melted orange candy melts.
- Refrigerate for 10-15 minutes until firm before serving.
- Prep Time: 15 minutes
- Cook Time: 0 minutes
- Category: Dessert
- Method: No baking required
- Cuisine: American
Nutrition
- Serving Size: 1 serving
- Calories: 150
- Sugar: 14g
- Sodium: 50mg
- Fat: 7g
- Saturated Fat: 3g
- Unsaturated Fat: 4g
- Trans Fat: 0g
- Carbohydrates: 21g
- Fiber: 0g
- Protein: 1g
- Cholesterol: 0mg
Keywords: For added flavor, try using flavored candy melts or adding sprinkles before the coating sets. To enhance presentation, serve on a colorful platter surrounded by seasonal decorations. Customize designs by using different colored candy melts or edible glitter.