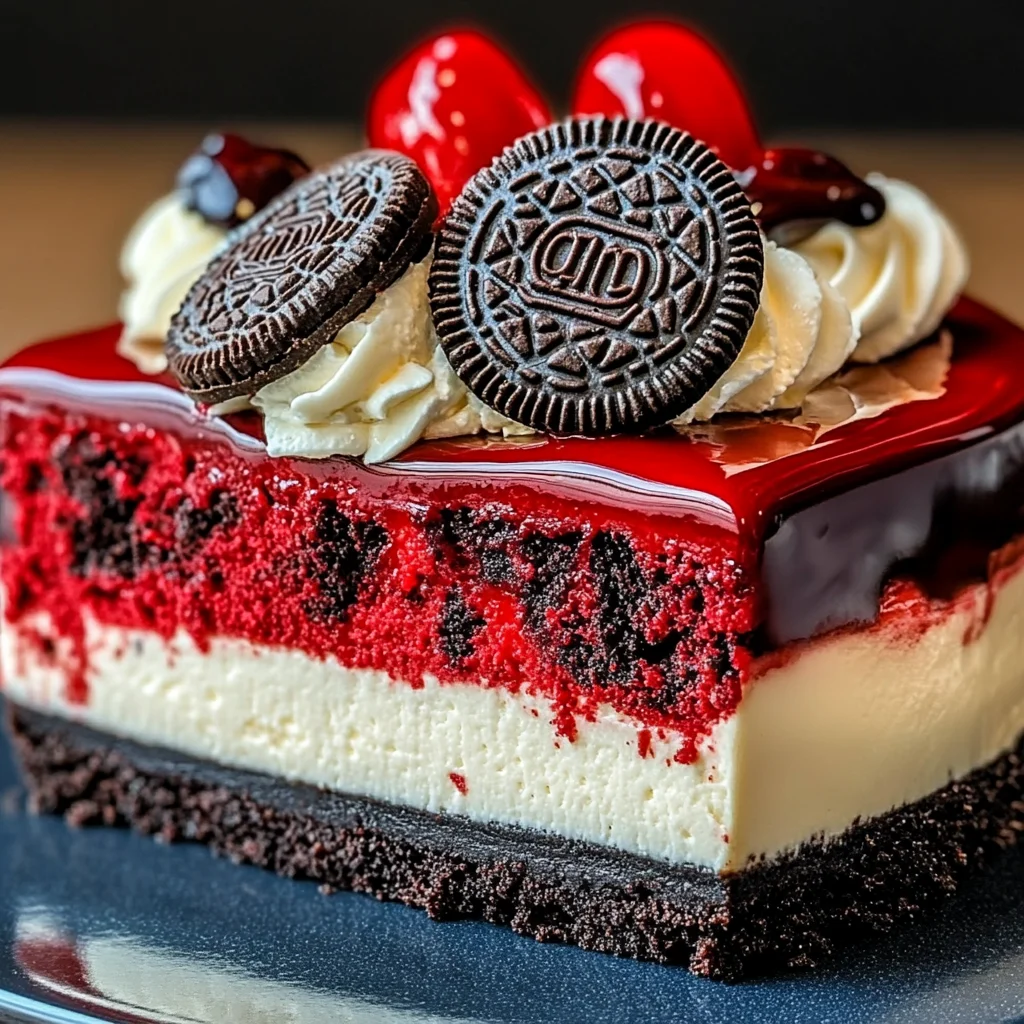
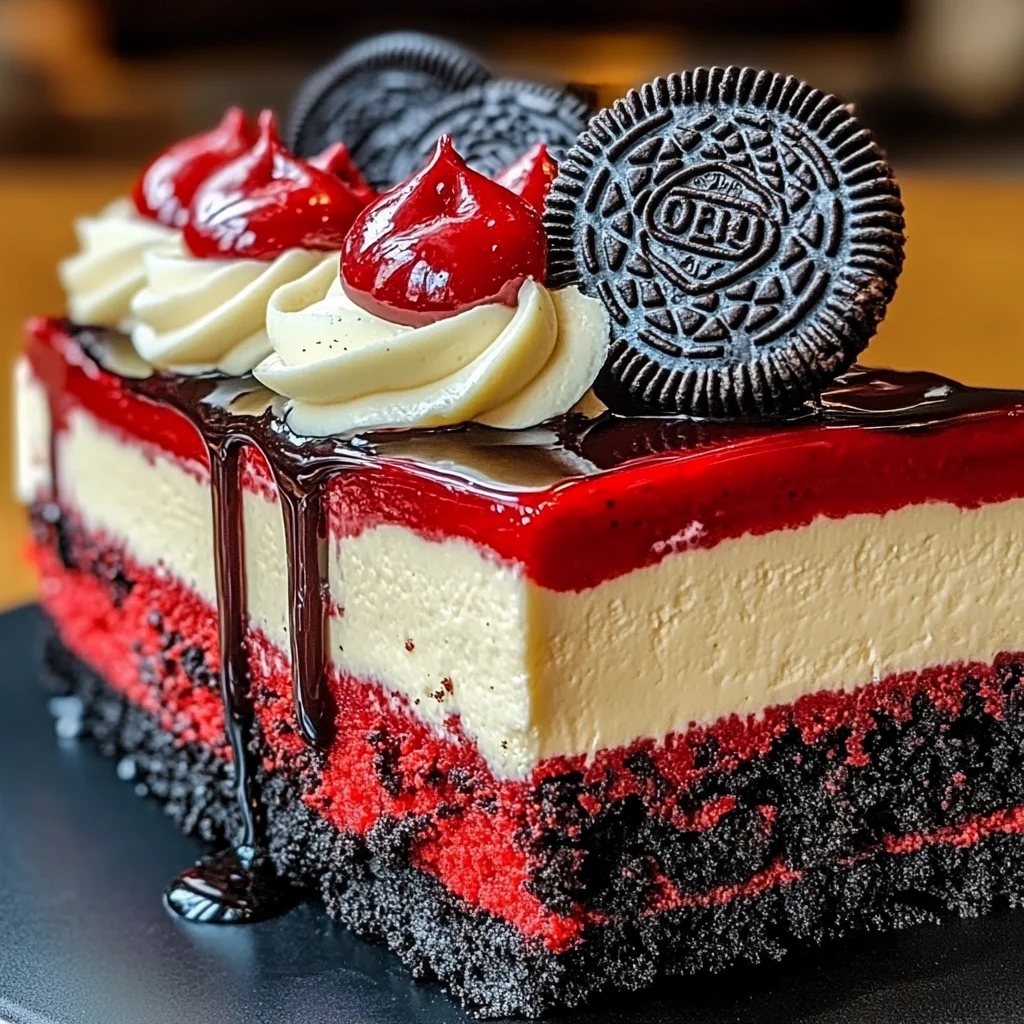
This Red Velvet Oreo Cheesecake is a delightful dessert that combines the rich flavors of red velvet with the creaminess of cheesecake, all on a delicious Oreo crust. Whether it’s a birthday celebration, holiday gathering, or simply a treat for yourself, this cheesecake is sure to impress. Its unique layers and stunning presentation make it a standout choice for any occasion!
Why You’ll Love This Recipe
- Indulgent Flavor: The combination of red velvet and creamy cheesecake creates an unforgettable taste experience.
- Stunning Presentation: This dessert looks as amazing as it tastes, making it perfect for impressing guests.
- Versatile Occasion: Ideal for birthdays, anniversaries, or just because—you’ll find any reason to whip this up!
- Easy to Follow: Clear instructions ensure that even beginner bakers can create this masterpiece with confidence.
- Decadent Toppings: The chocolate ganache and whipped cream add an extra touch of luxury that everyone will love.
Tools and Preparation
Before you start making your Red Velvet Oreo Cheesecake, gather your tools. Having everything ready will make the process smoother.
Essential Tools and Equipment
- 9-inch springform pan
- Mixing bowls
- Electric mixer
- Rubber spatula
- Measuring cups and spoons
- Parchment paper
- Saucepan
Importance of Each Tool
- 9-inch springform pan: This allows for easy removal of the cheesecake without damaging its structure.
- Electric mixer: Ensures that your cream cheese mixture is smooth and free of lumps.
- Rubber spatula: Perfect for scraping down the sides of bowls and transferring mixtures evenly.
Ingredients
For the Crust
- 2 ½ cups Oreo cookie crumbs (about 25-30 cookies, crushed)
- 5 tbsp unsalted butter, melted
For the Red Velvet Layer
- 16 oz (2 blocks) cream cheese, softened
- ¾ cup granulated sugar
- ¼ cup sour cream
- 2 large eggs
- 1 ½ tbsp cocoa powder
- 1 ½ tsp vanilla extract
- 1 tbsp red food coloring
For the Vanilla Layer
- 16 oz (2 blocks) cream cheese, softened
- ¾ cup granulated sugar
- ¼ cup sour cream
- 2 large eggs
- 1 ½ tsp vanilla extract
For the Ganache and Toppings
- ½ cup heavy cream
- ¾ cup semi-sweet chocolate chips
- Whipped cream
- Oreo cookie crumbs
- Whole Oreos

How to Make Red Velvet Oreo Cheesecake
Step 1: Preheat the Oven
Preheat your oven to 325°F (163°C). Grease a 9-inch springform pan and line the bottom with parchment paper.
Step 2: Prepare the Crust
- In a bowl, mix together the Oreo cookie crumbs and melted butter until well combined.
- Press this mixture firmly into the bottom of your prepared pan.
- Bake for 8-10 minutes, then set aside to cool.
Step 3: Make the Red Velvet Layer
- In a large mixing bowl, beat together the softened cream cheese and granulated sugar until smooth.
- Add in sour cream, eggs, cocoa powder, vanilla extract, and red food coloring. Mix until fully combined.
- Pour this red velvet batter over your cooled crust. Spread evenly.
Step 4: Make the Vanilla Layer
- In another bowl, beat together more softened cream cheese and granulated sugar until smooth.
- Add in sour cream, eggs, and vanilla extract. Mix well until fully incorporated.
- Carefully pour this mixture over the red velvet layer, smoothing out the top.
Step 5: Bake and Cool
- Bake at 325°F (163°C) for about 50-60 minutes or until edges are set but center remains slightly jiggly.
- Turn off the oven and leave the cheesecake inside with the door slightly open for 1 hour.
Step 6: Chill
Transfer your cheesecake to the refrigerator and let it chill for at least 6 hours or overnight.
Step 7: Prepare Ganache
- Heat heavy cream in a saucepan until hot but not boiling.
- Pour over chocolate chips in a bowl. Let sit for two minutes before stirring until smooth.
Step 8: Finish Your Cheesecake
- Once ganache has cooled slightly, pour it over your chilled cheesecake and spread evenly.
- Pipe whipped cream around the edges and sprinkle with additional Oreo crumbs.
- Decorate with whole Oreos on top.
Step 9: Serve
Slice your Red Velvet Oreo Cheesecake into servings and enjoy chilled!
How to Serve Red Velvet Oreo Cheesecake
Serving Red Velvet Oreo Cheesecake can elevate your dessert experience, making it perfect for any occasion. Here are some delightful serving suggestions that will impress your guests and enhance the flavors of this indulgent treat.
Individual Slices
- Serve each slice on its own plate for a more elegant presentation. Garnish with a dollop of whipped cream and a sprinkle of Oreo crumbs for added flair.
With Fresh Berries
- Accompany your cheesecake with fresh strawberries, raspberries, or blueberries. The tartness of the berries complements the richness of the cheesecake beautifully.
Chocolate Sauce Drizzle
- Drizzle warm chocolate sauce over each slice just before serving. This adds an extra layer of decadence and visual appeal.
Ice Cream Pairing
- Serve with a scoop of vanilla or cookies-and-cream ice cream for a delightful contrast in temperatures and textures.
Coffee or Tea
- Pair slices with a cup of coffee or tea. The warmth and aroma help balance the sweetness of the cheesecake.
Festive Toppings
- Get creative with toppings! Consider crushed nuts, caramel sauce, or even edible glitter for special occasions like birthdays or holidays.
How to Perfect Red Velvet Oreo Cheesecake
Achieving the perfect Red Velvet Oreo Cheesecake requires attention to detail. Here are some tips to ensure your cheesecake turns out delicious every time.
- Use Room Temperature Ingredients: Make sure your cream cheese and eggs are at room temperature. This helps create a smooth batter without lumps.
- Avoid Overmixing: Mix ingredients just until combined to prevent incorporating too much air, which can lead to cracks in your cheesecake.
- Cool Gradually: After baking, leave the cheesecake in the oven with the door slightly ajar for an hour. This gradual cooling helps prevent cracks on the surface.
- Chill Overnight: For best results, let your cheesecake chill overnight. This allows flavors to meld and results in a firmer texture.
- Use Quality Ingredients: Choose high-quality cream cheese and chocolate chips. The better the ingredients, the better your cheesecake will taste!
- Experiment with Flavors: Feel free to add spices like cinnamon or nutmeg to complement the cocoa flavor in your red velvet batter.
Best Side Dishes for Red Velvet Oreo Cheesecake
Pairing side dishes with your Red Velvet Oreo Cheesecake can create a balanced meal experience. Here are some excellent options to consider that complement this rich dessert well.
- Fruit Salad: A light mix of seasonal fruits serves as a refreshing contrast to the dense cheesecake.
- Chocolate Mousse: A small serving of rich chocolate mousse can add another layer of indulgence while enhancing chocolate flavors.
- Pecan Pie: The nutty sweetness of pecan pie pairs wonderfully with creamy desserts, offering different textures.
- Carrot Cake: Another classic dessert, carrot cake’s spices harmonize nicely with red velvet flavors.
- Cheeseboard: A selection of cheeses and crackers can provide savory balance alongside sweet desserts.
- Vanilla Pudding: Light vanilla pudding enhances creaminess while keeping things simple and tasty.
- Coffee Cake: A slice of coffee cake makes for an excellent pairing, especially during brunch gatherings.
- Brownies: Rich brownies offer another chocolatey touch that complements the flavors found in red velvet cheesecake perfectly.
Common Mistakes to Avoid
When making Red Velvet Oreo Cheesecake, it’s easy to make a few common mistakes. Here are some pitfalls to watch out for:
- Skipping the crust cooling step: Allowing the crust to cool before adding the cheesecake batter is crucial. If you skip this, the layers may mix together, ruining the presentation.
- Not using room temperature ingredients: Cold cream cheese or eggs can result in a lumpy batter. Always let your ingredients come to room temperature for a smooth consistency.
- Overmixing the batter: Mixing too vigorously can incorporate air, leading to cracks during baking. Mix just until combined to maintain a creamy texture.
- Ignoring baking time: Each oven is different. Keep an eye on your cheesecake and use the jiggle test; it should be slightly jiggly in the center when done.
- Cutting too soon: Patience is key! Letting the cheesecake chill for at least 6 hours ensures it sets properly and makes slicing easier.
Storage & Reheating Instructions
Refrigerator Storage
- item Store any leftover Red Velvet Oreo Cheesecake in an airtight container.
- item It will keep well in the fridge for up to 5 days.
- item For best flavor, consume within 3 days.
Freezing Red Velvet Oreo Cheesecake
- item You can freeze slices of cheesecake for up to 3 months.
- item Wrap each slice tightly in plastic wrap, then place it in an airtight container.
- item Thaw in the refrigerator overnight before serving.
Reheating Red Velvet Oreo Cheesecake
- Oven: Preheat your oven to 250°F (121°C) and place the cheesecake on a baking sheet. Warm for about 15-20 minutes until slightly softened.
- Microwave: Use a microwave-safe plate and heat individual slices for about 10-15 seconds at a time until warmed through.
- Stovetop: Place a slice in a skillet over low heat, cover with a lid, and warm gently for about 5 minutes.

Frequently Asked Questions
Can I make Red Velvet Oreo Cheesecake ahead of time?
Yes! This cheesecake is perfect for making ahead. It tastes even better after chilling overnight.
What can I substitute for red food coloring in Red Velvet Oreo Cheesecake?
You can use beet juice or pomegranate juice as natural alternatives. Keep in mind that these may alter the flavor slightly.
How do I prevent cracks in my Red Velvet Oreo Cheesecake?
To avoid cracks, ensure that all ingredients are at room temperature and don’t overmix. Also, allow the cheesecake to cool gradually in the oven.
What toppings pair well with Red Velvet Oreo Cheesecake?
Whipped cream, crushed Oreos, or fresh berries complement this dessert beautifully. Feel free to get creative with your toppings!
Final Thoughts
This Red Velvet Oreo Cheesecake is not only visually stunning but also incredibly versatile. Its rich flavors make it perfect for special occasions or simply when you’re craving something indulgent. Customize it with your favorite toppings or variations, and enjoy this delightful treat!

Red Velvet Oreo Cheesecake
Indulge in the rich and decadent flavors of Red Velvet Oreo Cheesecake, a delightful dessert that marries the classic taste of red velvet cake with the creaminess of cheesecake, all resting on a crispy Oreo crust. Perfect for any celebration or as a sweet treat for yourself, this cheesecake is visually stunning with its striking layers and luxurious toppings. With easy-to-follow instructions, even novice bakers can create this masterpiece with confidence. Serve it at birthdays, holidays, or simply as a special dessert to impress family and friends.
- Total Time: 1 hour 30 minutes
- Yield: Serves approximately 12 slices 1x
Ingredients
- 2 ½ cups Oreo cookie crumbs
- 16 oz cream cheese (for both layers)
- ¾ cup granulated sugar (for both layers)
- ¼ cup sour cream (for both layers)
- 4 large eggs (2 for each layer)
- 1 tbsp red food coloring
- ½ cup heavy cream (for ganache)
- ¾ cup semi-sweet chocolate chips
Instructions
- Preheat your oven to 325°F (163°C) and prepare a 9-inch springform pan.
- Combine Oreo crumbs and melted butter, press into the pan, and bake for 8-10 minutes.
- Blend cream cheese and sugar for the red velvet layer; add remaining ingredients, then pour over crust.
- For the vanilla layer, blend cream cheese and sugar; pour over the red velvet layer.
- Bake for about 50-60 minutes until edges are set; cool gradually in the oven.
- Chill for at least 6 hours before adding ganache made from heavy cream and chocolate chips.
- Prep Time: 30 minutes
- Cook Time: 60 minutes
- Category: Dessert
- Method: Baking
- Cuisine: American
Nutrition
- Serving Size: 1 serving
- Calories: 410
- Sugar: 29g
- Sodium: 280mg
- Fat: 30g
- Saturated Fat: 14g
- Unsaturated Fat: 12g
- Trans Fat: 0g
- Carbohydrates: 34g
- Fiber: 2g
- Protein: 6g
- Cholesterol: 100mg
Keywords: Use room temperature ingredients for a smoother batter. Let the cheesecake cool slowly to prevent cracks. Feel free to add spices like cinnamon for extra flavor variations.