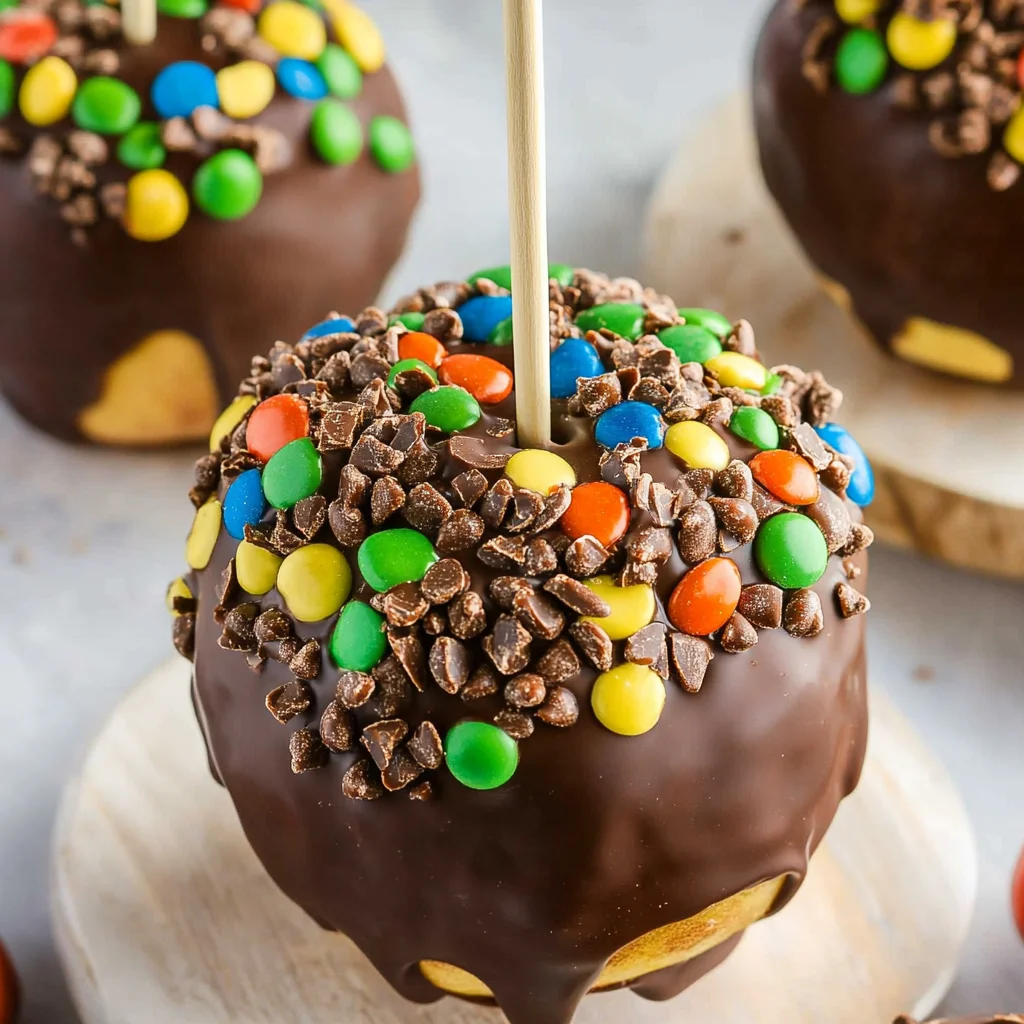
Chocolate-covered apples are a delightful treat that combines sweet chocolate and tart apple flavors. Perfect for Halloween parties, fall gatherings, or any sweet craving, these treats are customizable with your favorite toppings. The contrast of smooth chocolate with crisp apples makes every bite a unique experience. Plus, they’re easy to make and a hit with both kids and adults!
Why You’ll Love This Recipe
- Fun to Make: Involving the whole family in making chocolate-covered apples can be a joyous activity.
- Customizable Toppings: Choose from candy, nuts, or sprinkles to personalize your treats.
- Perfect for Any Occasion: Whether it’s Halloween or a cozy fall evening, these apples fit right in.
- Healthy Twist: Using fresh apples adds a nutritious element to this indulgent dessert.
- Simple Ingredients: You probably already have most of the ingredients at home, making this recipe accessible.
Tools and Preparation
Before you start making your delicious chocolate-covered apples, gather the necessary tools. These items will help streamline your process and ensure the best results.
Essential Tools and Equipment
- Wooden popsicle sticks or skewers
- Microwave-safe bowl
- Baking sheet
- Parchment paper
Importance of Each Tool
- Wooden popsicle sticks or skewers: These make it easy to dip and hold the apples without getting messy.
- Microwave-safe bowl: A larger bowl ensures you can dip each apple fully into the melted chocolate.
- Baking sheet: Provides a stable surface for cooling the coated apples without sticking.
Ingredients
For the Chocolate Coating
- 6-8 small or medium apples
- 1 cup semi-sweet chocolate chips (or chopped chocolate; for vegan option, use vegan chocolate)
- 1 tablespoon refined coconut oil
For Toppings
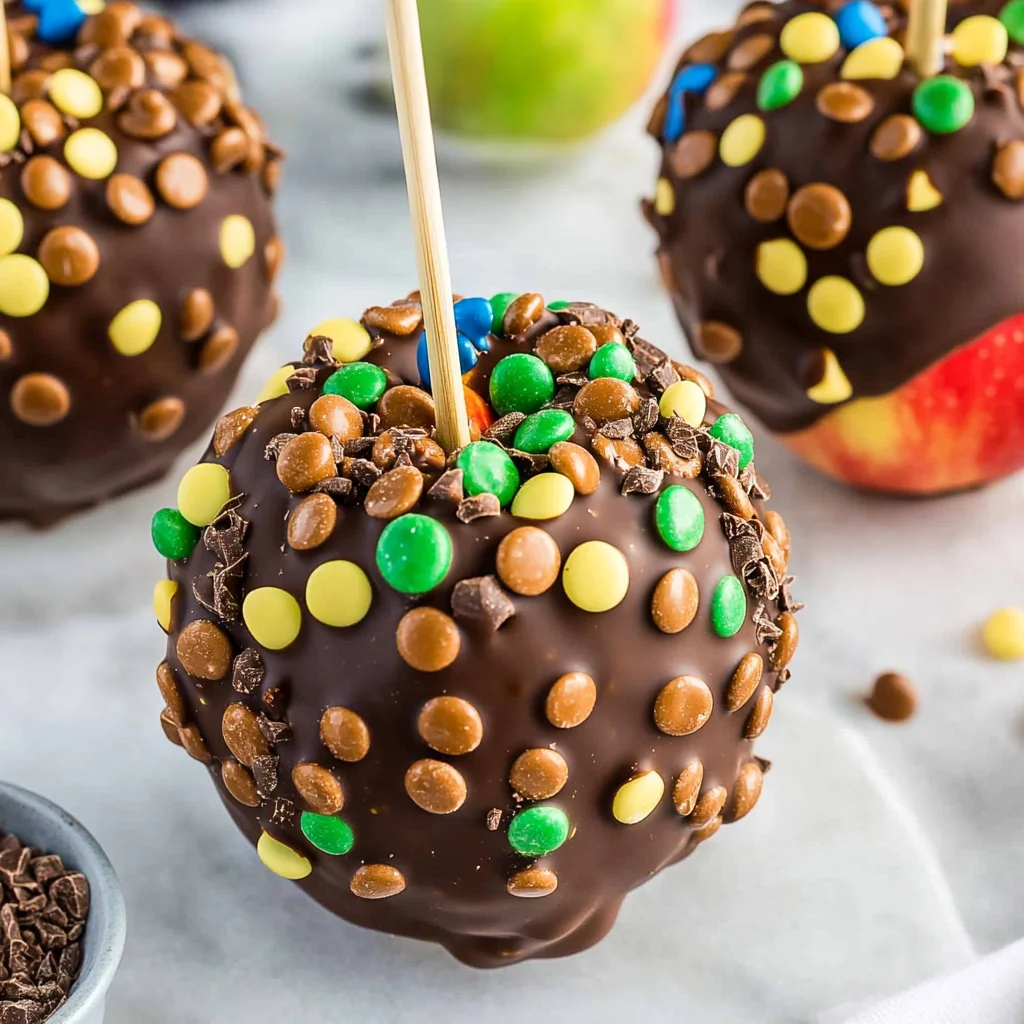
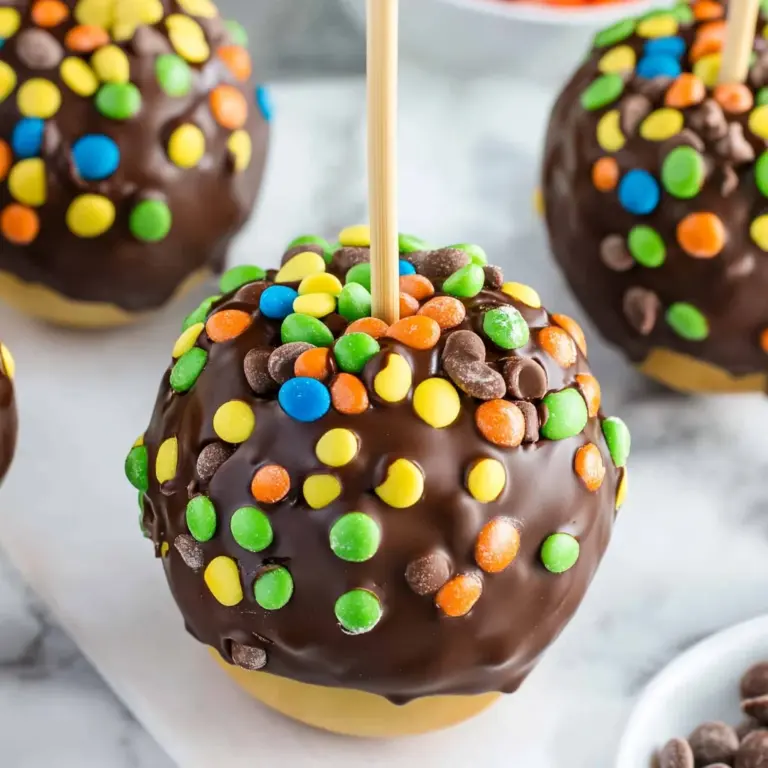
- 1/2 cup candy (mini M&M’s work great)
- 1/2 cup peanuts (very finely chopped)
For Assembly
- Wooden popsicle sticks or skewers
How to Make Chocolate Covered Apples
Step 1: Prepare Your Baking Sheet
Prepare a baking sheet by lining it with parchment paper. This will prevent your chocolate-covered apples from sticking.
Step 2: Wash the Apples
Wash and dry the apples thoroughly. Ensuring they are completely dry helps the chocolate adhere better.
Step 3: Insert Sticks into Apples
Insert wooden popsicle sticks into the top of 6 apples, pushing them almost all the way down. Depending on their size, you may have extra chocolate for more apples later.
Step 4: Melt the Chocolate
In a microwave-safe bowl, combine semi-sweet chocolate chips and refined coconut oil. Microwave at half power in 30-second intervals, stirring between until smooth.
Step 5: Dip Apples in Chocolate
Hold each apple by its stick and dip it into the melted chocolate, turning to coat evenly. Allow excess chocolate to drip off before proceeding.
Step 6: Add Toppings
Immediately after dipping each apple, sprinkle mini M&M’s over them followed by chopped peanuts. If needed, refrigerate briefly if toppings slide off due to thin chocolate.
Step 7: Cool and Store
Place the coated apples on your prepared baking sheet. Refrigerate for about 30 minutes until set. Once hard, store uncut apples in an airtight container at room temperature for up to three days or refrigerated for up to a week.
Enjoy your delicious homemade Chocolate Covered Apples!
How to Serve Chocolate Covered Apples
Serving chocolate covered apples can be a delightful experience. They are not only visually appealing but also offer various ways to enjoy them. Here are some fun serving suggestions to elevate your dessert.
For a Festive Touch
- Halloween Treats: Use themed decorations like edible googly eyes or orange and black sprinkles for a spooky effect.
- Party Platters: Arrange sliced chocolate covered apples on a platter with other treats for an attractive dessert table centerpiece.
Dipping Stations
- Flavorful Dips: Set up a dipping station with caramel sauce, peanut butter, or yogurt for guests to customize their chocolate covered apples.
- Toppings Bar: Offer various toppings such as crushed cookies, nuts, and dried fruits so everyone can create their perfect combination.
Individual Servings
- Skewered Treats: Serve chocolate covered apples on wooden skewers for easy handling at parties or picnics.
- Mini Apple Bites: Slice small apples into wedges and dip them halfway in chocolate for bite-sized treats ideal for kids and adults alike.
How to Perfect Chocolate Covered Apples
To ensure your chocolate covered apples turn out beautifully, consider these helpful tips.
- Bold choice of chocolate: Use high-quality semi-sweet or vegan chocolate for the best flavor and texture.
- Boldly dry apples: Make sure the apples are completely dry before dipping; this helps the chocolate adhere better.
- Bold cooling method: After dipping, allow the chocolate coated apples to cool slightly before adding toppings, ensuring they stick well.
- Bold melting technique: Microwave the chocolate in short intervals to avoid burning; stirring regularly leads to a smooth consistency.
- Bold refrigeration tips: Chill your finished products in the fridge for at least 30 minutes to set the chocolate properly.
Best Side Dishes for Chocolate Covered Apples
Pairing side dishes with your chocolate covered apples can enhance your dessert experience. Here are some excellent options:
- Cheese Platter: A mix of sharp cheddar and creamy brie complements the sweetness of the apples beautifully.
- Fruit Salad: Fresh fruits like berries and bananas add freshness and balance out the richness of the chocolate.
- Caramel Sauce: Drizzling caramel over your apples adds an extra layer of flavor that many enjoy.
- Nut Mix: A variety of nuts offers a crunchy contrast to the soft texture of the chocolate covered apples.
- Yogurt Dipping Sauce: A light yogurt dip can provide a refreshing counterpart to sweet desserts.
- Chocolate Fondue: Create a fun interactive dessert by offering additional fruits and snacks for dipping alongside your apple treats.
Common Mistakes to Avoid
When making chocolate-covered apples, avoiding common pitfalls can elevate your treat. Here are some mistakes to watch out for:
- Not drying the apples properly: If the apples are wet, the chocolate won’t adhere well. Make sure to wash and completely dry them before dipping.
- Using too much heat when melting chocolate: Melting chocolate at high temperatures can cause it to seize or become grainy. Always microwave at half power in short intervals.
- Overloading on toppings: While toppings like nuts or candy can enhance flavor, adding too many can make them slide off. Sprinkle gently and allow the chocolate to set first if needed.
- Skipping refrigeration time: Not letting the chocolate set can lead to messy bites and a less appealing appearance. Refrigerate the dipped apples for at least 30 minutes.
- Choosing the wrong apple variety: Some apples are too soft or watery, which makes them less ideal for coating in chocolate. Opt for firmer varieties like Granny Smith or Honeycrisp for best results.
Storage & Reheating Instructions
Refrigerator Storage
- Store uncut chocolate-covered apples in an airtight container.
- They will last up to 3 days at room temperature or up to a week in the refrigerator.
Freezing Chocolate Covered Apples
- Wrap each apple individually in plastic wrap before placing them in a freezer-safe container.
- They can be frozen for up to three months. Thaw in the refrigerator before serving.
Reheating Chocolate Covered Apples
- Oven: Preheat your oven to 200°F (93°C) and place the apples on a baking sheet. Warm them for about 5-10 minutes until the chocolate is slightly melty but not fully melted.
- Microwave: Use short bursts of 10-15 seconds on low power. Monitor closely to prevent overheating.
- Stovetop: Place a heat-safe bowl over simmering water (double boiler method). Stir gently until just warm and melty.

Frequently Asked Questions
How do I make vegan chocolate-covered apples?
You can easily make vegan chocolate-covered apples by using dairy-free chocolate chips and refined coconut oil as your melting agent.
Can I use different types of toppings on my Chocolate Covered Apples?
Absolutely! Feel free to get creative with toppings like crushed cookies, sprinkles, or even shredded coconut to customize your treats.
What types of apples work best for Chocolate Covered Apples?
Firmer apple varieties like Granny Smith or Fuji are excellent choices as they hold up well when coated in chocolate.
How long do Chocolate Covered Apples last?
When stored properly, uncut Chocolate Covered Apples can last up to 3 days at room temperature and up to a week in the refrigerator.
Can I decorate my Chocolate Covered Apples for Halloween?
Definitely! You can use colored sprinkles, themed candies, or even edible glitter to create festive designs perfect for Halloween celebrations.
Final Thoughts
Chocolate-covered apples are not only delicious but also versatile. They are perfect for any occasion, from fall festivities to simple family treats. Plus, you can customize them with various toppings based on your preferences. Give this recipe a try and enjoy creating your delightful variations!
Chocolate-Covered Apples
Chocolate-covered apples are a delightful combination of sweet and tart flavors, making them the perfect treat for any occasion. With a crisp apple coated in smooth, velvety chocolate, these treats are not only visually appealing but also customizable with your favorite toppings. Whether you’re preparing for Halloween parties, cozy fall gatherings, or simply craving something sweet, chocolate-covered apples are sure to be a hit with both kids and adults alike. They are easy to make and offer a healthier twist by incorporating fresh apples into the mix. Gather your family for a fun cooking activity and create your own delicious variations!
- Total Time: 20 minutes
- Yield: Approximately 6 servings 1x
Ingredients
- 6–8 small or medium apples
- 1 cup semi-sweet chocolate chips (or vegan chocolate)
- 1 tablespoon refined coconut oil
- 1/2 cup mini M&M's (or other candies)
- 1/2 cup finely chopped peanuts
Instructions
- Line a baking sheet with parchment paper.
- Wash and dry the apples thoroughly.
- Insert wooden sticks into the tops of each apple.
- In a microwave-safe bowl, melt chocolate chips with coconut oil on half power in 30-second intervals until smooth.
- Dip each apple into the melted chocolate, allowing excess to drip off.
- Sprinkle desired toppings immediately after dipping.
- Place apples on the prepared baking sheet and refrigerate for about 30 minutes until set.
- Prep Time: 15 minutes
- Cook Time: 5 minutes
- Category: Dessert
- Method: Baking
- Cuisine: American
Nutrition
- Serving Size: 1 apple (approx. 140g)
- Calories: 210
- Sugar: 25g
- Sodium: 10mg
- Fat: 9g
- Saturated Fat: 5g
- Unsaturated Fat: 3g
- Trans Fat: 0g
- Carbohydrates: 33g
- Fiber: 3g
- Protein: 2g
- Cholesterol: 0mg
Keywords: Ensure apples are completely dry for better chocolate adherence. Experiment with various toppings like crushed cookies or shredded coconut for unique flavors. Store uncut apples in an airtight container at room temperature for up to three days or in the refrigerator for up to a week.